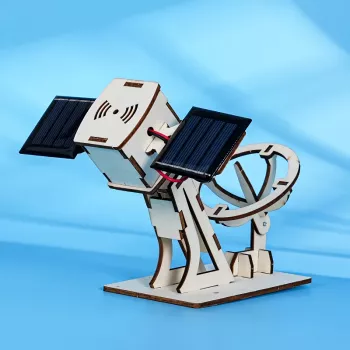
A hands-on science kit can do more than entertain—it can turn big, “how does that work?” questions into something kids can build, test, and improve. The Solar-Powered Radar Satellite Science Kit for Kids STEM Learning blends solar power concepts with satellite-inspired design and kid-friendly sensing themes to create an engaging STEM project that rewards curiosity and careful problem-solving.
As kids assemble the model, they practice foundational skills—basic circuits, energy transfer, observation, and iterative troubleshooting—while connecting the build to real-world space technology. For approachable background reading, NASA’s simple explanations of what satellites are and how solar power supports space missions make great companion references.
This satellite-themed build is designed to feel like a “mission,” where each successful step unlocks the next. Along the way, kids learn:
Solar STEM kits typically include a solar panel, wiring/circuit parts, body pieces for the main structure, and sensor-related elements that support the “radar-style” theme. The build generally comes together in a clear sequence:
For best results, take extra care with wiring alignment and connection points. Many “it won’t turn on” moments come down to a loose contact, reversed polarity, or not enough light hitting the panel. A bright window, direct sun, or a strong indoor lamp and a clutter-free workspace (plus a small tray for parts) can make the experience smoother.
| Stage | What Kids Do | What They Learn |
|---|---|---|
| Assemble | Fit the satellite body pieces and mount parts securely | Structure, stability, following multi-step directions |
| Power Up | Connect solar panel and circuit path; test under light | Energy conversion, circuits, troubleshooting |
| Sense & Explore | Try the sensing/radar-style features and observe behavior | Signals/sensing concepts, cause-and-effect |
| Improve | Adjust angles, light exposure, and connections for better performance | Iteration, measurement, problem-solving |
This kit fits a wide range of learners and settings, especially when the goal is a meaningful build with real “aha” moments.
The difference between “it worked!” and “why is nothing happening?” is often the setup. A few simple habits can make the build more reliable and more educational.
Once the build runs, the real fun begins: changing one variable at a time and watching how the system responds.
Direct sunlight typically delivers the best performance. Indoors can work with a bright lamp placed close enough and with the solar panel angled directly at the light source.
It’s a strong fit for elementary-to-middle school ages, especially kids who like building and experimenting. Younger children usually do best with adult help for small parts and wiring connections.
Check light intensity and panel angle first, then re-seat all connections and confirm correct polarity/contacts. If needed, test step-by-step (power stage before add-ons) to quickly isolate where the issue starts.


Leave a comment
You must be logged in to post a comment.