
A top handle is one of the simplest upgrades for handheld shooting: it adds a secure carry point, improves low-angle control, and helps stabilize movement when a rig gets heavier. A quick-release version goes further by letting the handle come on and off in seconds—useful when switching between gimbal, tripod, and handheld setups. For more guidance, see Micro 4/3 – Review: Haoge HG-EM5III (E-M5 mark III) grip.
Once a cage, monitor, mic, and light go on, the “small” camera quickly becomes a hard-to-hold bundle of weight and leverage. A top handle gives a more natural grip point above the rig, which changes how smoothly you can move and how long you can comfortably operate. For further reading, see First Impressions of the Manfrotto MS050M4-Q2 L-Bracket – Nikonians.
For event coverage, BTS, or street shooting, the biggest gain is often “micro-control”: reducing tiny wobbles when starting/stopping movement or when pivoting around obstacles.
Both styles do the same basic job, but they fit different workflows. If the rig stays in one configuration all day, a fixed mount is straightforward. If you’re constantly changing supports, quick release saves minutes that add up—especially when the pace is high.
| Type | Best for | Trade-offs |
|---|---|---|
| Quick release top handle | Fast swaps between handheld, tripod, and gimbal | Slightly more parts to manage; check lock before each take |
| Fixed-mount top handle | Set-and-forget rigs with minimal reconfiguration | Slower changes; more time spent threading/tightening |
A 1/4” mount is the common thread size used across a huge range of camera accessories (often referenced as 1/4”-20). It’s widely found on cages, top plates, and accessory rails, which makes it a practical standard for compact rigs.
If you want to sanity-check the “standard,” the 1/4” tripod connection is covered under ISO documentation for photography support interfaces (see ISO 1222:2010 — Tripod connections). For broader context on accessory ecosystems and mounting approaches, ARRI’s overview of standards is also a helpful reference point: ARRI — Camera Accessory Mounting Standards.
Quick release is about speed, but speed only matters if it’s repeatable and safe. A few habits can dramatically reduce the chance of a mishap—especially when you’re moving fast between setups.
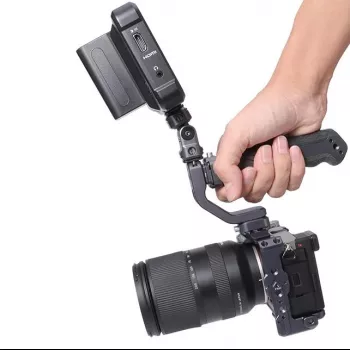
Quick Release Camera Top Handle Grip with 1/4” Mount is built for fast attachment and removal, making it a practical option for creators who alternate between handheld, tripod, and gimbal setups throughout the day.
| Item | Detail |
|---|---|
| Name | Quick Release Camera Top Handle Grip with 1/4” Mount |
| Price | 53.67 USD |
| Availability | In stock |
Many cages and top plates include 1/4”-20 threaded holes, so compatibility is often good. Still, confirm the exact thread standard, hole placement, and clearance for screens, dials, and any hot-shoe accessories before mounting.
It can be secure when the mechanism has a positive lock and you verify it’s fully engaged. Do a quick lift-and-tug test before moving, and re-check the lock periodically—especially if you’re using heavier lenses or adding accessories.
Place it near the rig’s center of gravity so the camera hangs level when carried. If the lens is front-heavy or you have a rear battery/monitor setup, shift the handle slightly forward or back and test comfort before shooting.



Leave a comment
You must be logged in to post a comment.